Ghost Mannequin Editing: A Practical Method to Improve Apparel Shape Clarity
Learn how ghost mannequin editing turns mannequin-shot apparel into clean hollow-body product images that show shape, neckline detail, catalog consistency, and buyer confidence.
ServicesPublished June 27, 202611 min readBy the Reframe Visuals editors
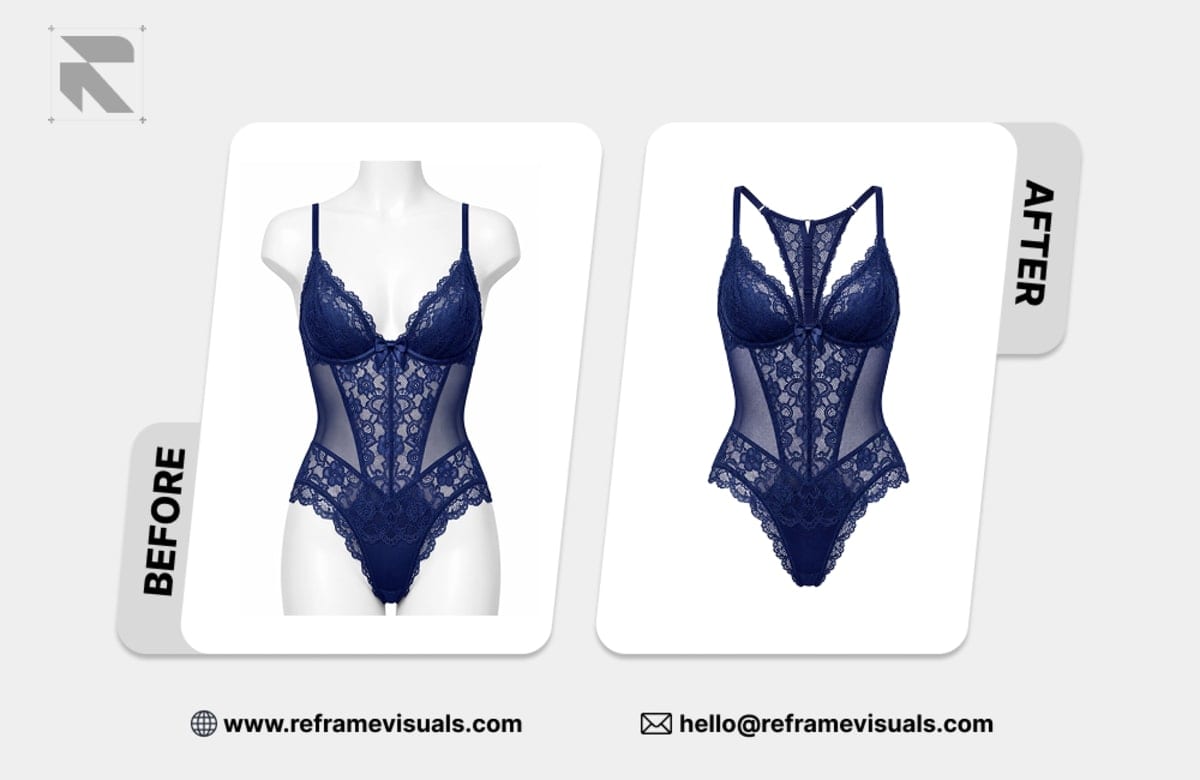
A shirt can be well-made and still look shapeless online.
That is one of the hardest problems in apparel ecommerce. Customers cannot touch the fabric. They cannot pull the sleeve, check the neckline, open the collar, or feel how the garment holds its structure. The product image has to answer those questions before the customer reads the size chart.
Ghost mannequin editing solves a specific part of that problem.
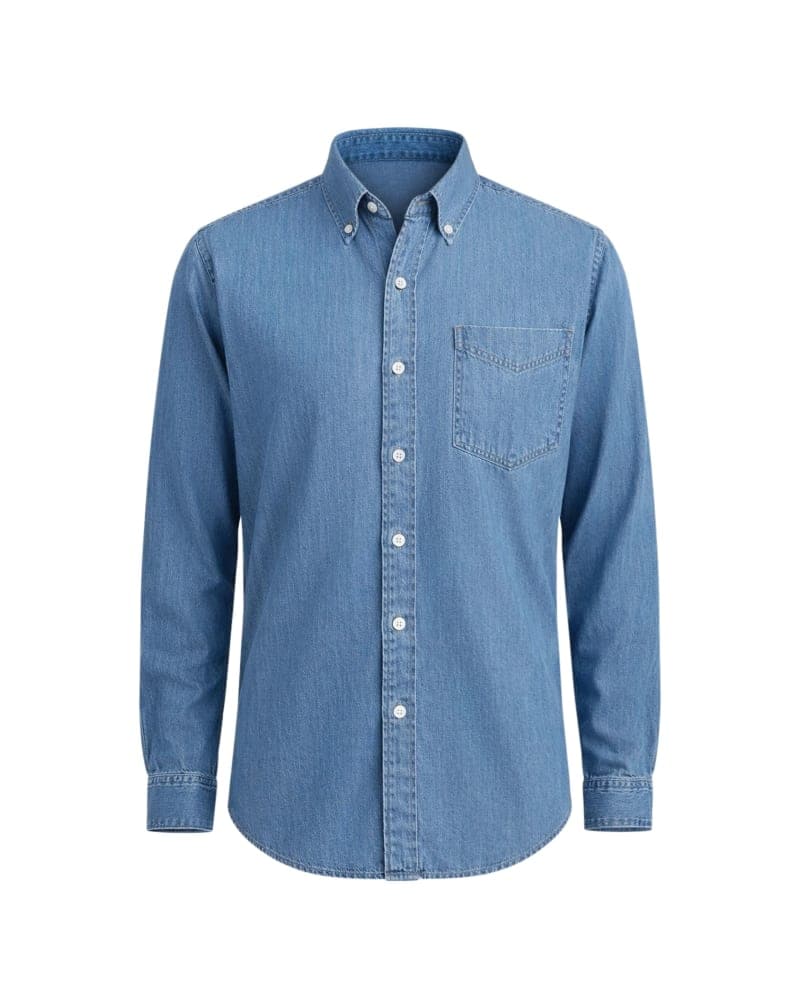
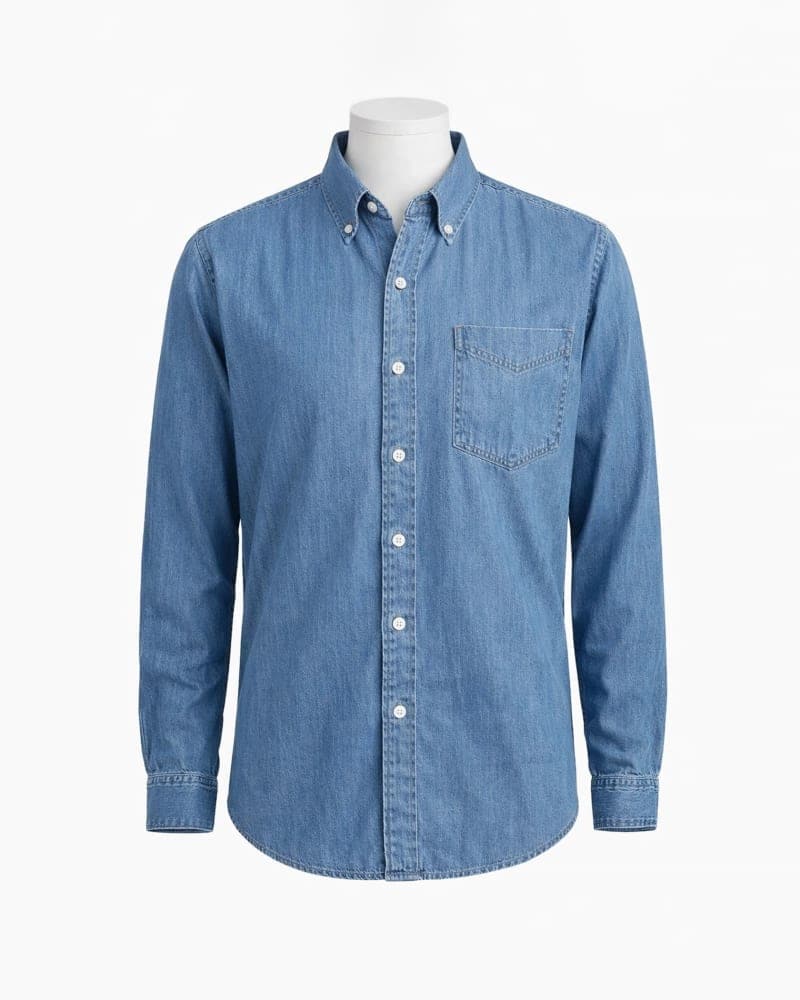
It removes the physical mannequin from an apparel photo while keeping the garment’s shape, volume, neckline, collar, sleeves, and inner details visible. The final image looks cleaner than a mannequin shot and more structured than a flat lay.
The value is clarity.
A shopper who understands the garment has fewer doubts. Fewer doubts can make the product page feel more trustworthy, especially for apparel where fit, shape, and fabric behavior affect the buying decision.
What is ghost mannequin editing?
Ghost mannequin editing is a post-production method where an editor removes the mannequin or dress form from an apparel image and rebuilds the hidden garment areas using additional source photos. The goal is to create a hollow-body product image that shows shape, neckline detail, and garment structure without showing the mannequin.
This method is also called invisible mannequin editing or neck joint editing.
The basic idea sounds simple. Photograph the garment on a mannequin. Remove the mannequin. Show the garment by itself.
The real work is more detailed.
Once the mannequin disappears, the editor has to rebuild the parts of the garment that were hidden. The inside collar may need to be added from another image. The neckline may need reshaping. The shoulders may need alignment. The sleeves may need symmetry correction. The fabric may need light cleanup so the product looks polished without losing texture.
A good ghost mannequin image should not feel like an edit.
It should feel like a clean, structured product photo.
That is difficult because the editor is not only removing something. The editor is rebuilding the product’s physical logic.
Preparing an apparel catalog or seasonal collection drop?
Give your garments realistic 3D hollow-body volume, smooth collar symmetry, and pressed fabric without the model expense. Submit 3 test garments for free sample editing with 12h–72h turnaround.
Apparel images sell shape before they sell style
A product image has two jobs.
It needs to make the garment look attractive. It also needs to answer practical questions.
Will the collar hold its shape? Does the jacket have structure? Is the fabric thin or heavy? How does the sleeve fall? Does the product look premium or flat? Will the product match what the customer expects?
Flat lay photography answers some of these questions poorly. It can show color, fabric surface, pattern, and general design, but it often hides form. A folded shirt may look neat, but it does not explain how the body sits. A flat dress may show print detail, but it does not show volume. A hoodie without structure can look lifeless, even when the actual product has weight and shape.
Model photography answers a different set of questions. It shows fit, styling, proportion, and lifestyle. But it also adds variables. The model’s body type affects how the garment looks. Styling affects perception. Pose affects length and drape. Lighting and movement can create a stronger image, but it can also make catalog consistency harder.
Ghost mannequin editing sits between those two options.
It keeps the product as the main subject while giving it a body-like shape. The shopper sees the garment, not the hanger, model, or mannequin. The image feels cleaner, but it still carries enough structure to explain fit.
That is why apparel brands use ghost mannequin editing for product pages, collection grids, marketplace listings, and catalog systems.
It helps the product speak clearly.
Why flat apparel images often feel weak
Flat apparel images usually fail in one of three ways.
First, they remove too much structure. A shirt laid on a surface can lose shoulder shape. A jacket can look thinner than it is. A dress can look like fabric instead of a formed product.
Second, they change how the customer reads quality. When a garment looks flat, customers may assume the fabric is light, cheap, or poorly constructed. That may not be true. The photo has created the wrong expectation.
Third, they make comparison harder. In a catalog, shoppers compare multiple products quickly. If one product appears folded, another appears hanging, and another appears on a model, the grid feels inconsistent. The customer has to work harder to understand the collection.
Ghost mannequin editing solves these problems by giving each product a consistent visual structure.
The product sits upright. The neckline stays visible. The shoulders show shape. The sleeves and body have a more natural fall. The image keeps the garment clean and centered while removing anything that distracts from the product.
This is most useful for apparel categories where structure changes perceived value.
A blazer needs shape. A hoodie needs volume. A shirt needs collar clarity. A dress needs body flow. Sportswear needs cut and contour. Kidswear needs accurate proportions.
When the image hides these details, the product page loses information.
The best ghost mannequin edit starts before editing
A strong ghost mannequin result depends on the source photos.
Editing can refine a product image. It can combine multiple images. It can remove distractions. It can rebuild hidden areas when the editor has the right references.
But editing should not guess important garment details.
For most ghost mannequin edits, the editor needs at least two images:
- A main product photo on a mannequin
- An inner neck, label, or back-collar photo
For some products, extra photos help. Jackets, dresses, hoodies, blazers, and structured tops often need more than one support image. The editor may need an inner hem shot, sleeve opening, back view, hood detail, or inside lining photo.
The cleaner the source set, the cleaner the edit.
| Required Input | Purpose |
|---|---|
| Front mannequin image | Shows garment shape, silhouette, sleeve position, and main structure |
| Inner neck image | Rebuilds collar, label, and inside fabric after mannequin removal |
| Back image | Helps with rear details, alignment, and consistent product presentation |
| Detail image | Supports cuffs, hood, lining, zipper, hem, or inner opening reconstruction |
| Brand reference | Guides crop, background, shadow, spacing, and catalog style |
A weak source set limits the result.
If the inner collar image is missing, the editor may need to rebuild the neckline from limited visual information. That may work for simple crew neck shirts. It becomes risky for collared shirts, jackets, hoodies, dresses, and products with visible labels or inner stitching.
The best workflow is practical.
Shoot the garment on a mannequin. Then remove the garment and photograph the inner neck area in the same lighting. Keep the camera angle consistent. Keep the fabric position clean. Do not change the white balance. Do not crop too tightly before editing.
Small photography choices save editing time later.
The mannequin removal is only the first step
Many people think ghost mannequin editing means deleting the mannequin.
That is only the beginning.
The real work starts after removal. Once the mannequin is gone, the editor has to make the garment feel physically believable. The neckline cannot collapse. The shoulders cannot look stretched. The label cannot float. The inside fabric cannot sit at the wrong angle. The sleeves cannot look disconnected from the body.
A professional ghost mannequin edit usually includes:
- Manual clipping path around the garment
- Mannequin removal
- Neck joint compositing
- Inner collar reconstruction
- Sleeve and shoulder alignment
- Fabric cleanup
- Wrinkle control
- Symmetry correction
- Edge cleanup
- Shadow and depth adjustment
- Crop and spacing consistency
- Color correction across the batch
Each step protects shape clarity.
The garment should look empty, but not fake. It should look supported, but not stiff. It should feel clean, but not over-edited.
That balance separates a useful catalog image from a cheap cutout.
Poor ghost mannequin editing usually fails because the editor focuses only on removal. The mannequin disappears, but the product no longer makes sense. The neckline bends unnaturally. The collar looks pasted. The shoulders lose structure. The garment looks like a floating shell.
A good edit respects the garment’s construction.
The neck joint decides whether the edit feels professional
The neck area is where many ghost mannequin edits fail first.
A customer may not know the term “neck joint editing.” They still notice when something feels wrong. The collar looks pasted in. The label sits too high. The inside fabric does not match the outer fabric. The left and right collar edges do not align. The shadow feels too dark or too flat.
That small area can affect the whole image.
A clean neck joint needs three things.
First, the inner image must match the main image closely enough in angle, lighting, and fabric position. If the support photo uses different lighting, the collar may look like it came from another product.
Second, the editor has to mask and position the inner collar carefully. The inside fabric should follow the garment’s real construction. The collar opening should feel natural, not symmetrical in a mechanical way.
Third, shadows need to create depth without making the neck area look dirty or heavy. Too little shadow makes the collar feel flat. Too much shadow makes the garment look thick or poorly lit.
Small details matter here.
The curve inside a collar can change how structured the product feels. A label placed two pixels too high can look detached. A shadow that sits at the wrong angle can break the illusion of depth.
Good ghost mannequin editing is controlled. It does not shout.
Shape clarity reduces buyer doubt
Customers do not return apparel only because they dislike it.
They return apparel when the product does not match the expectation created by the product page.
Images create a large part of that expectation.
If the neckline looks wider than it is, the customer imagines a different fit. If the body shape looks flat, the product may seem cheaper than it is. If the sleeves look uneven, the garment feels poorly made. If the inside collar is missing, the image feels incomplete.
Ghost mannequin editing helps because it gives the shopper more visual information without adding distraction.
The customer sees:
- The real garment outline
- The collar and inner neck construction
- The sleeve length and fall
- The body width
- The product’s natural volume
- The fabric’s general behavior
- A consistent presentation across similar SKUs
This does not guarantee sales. No editing method can do that.
It reduces uncertainty.
That is enough to matter.
In ecommerce, shoppers make quick judgments from small signals. A clean neckline, balanced shoulder, and consistent product crop can make a product feel easier to trust. The effect is quiet, but useful.
The image does not have to impress the customer.
It has to answer the right questions.
Ghost mannequin vs flat lay vs hanger vs model photography
No apparel photography style is best for every product.
Each style has a job.
| Image Style | Best For | Weakness |
|---|---|---|
| Flat lay | Simple items, folded apparel, casual social content | Poor at showing volume, body shape, and garment structure |
| Hanger shot | Quick catalog capture, low-cost production | Can look less premium and less controlled |
| Model photo | Fit, styling, proportion, lifestyle, campaign use | Higher cost and more visual variables |
| Ghost mannequin | Clean product focus with 3D garment shape | Requires correct source photos and skilled editing |
Ghost mannequin works best when the product’s structure needs to be visible but the brand does not want a person in the frame.
It is especially useful for:
- T-shirts
- Polo shirts
- Dress shirts
- Jackets
- Hoodies
- Blazers
- Dresses
- Sportswear
- Sweaters
- Kidswear
- Uniforms
- Innerwear and basics, when handled carefully
The method is less useful when motion, styling, or body fit is the main selling point. A luxury dress may need model photography to show movement. Activewear may need lifestyle photography to show stretch and performance. Premium fashion may need editorial images for brand storytelling.
A strong apparel catalog often uses more than one style.
Ghost mannequin images explain the product. Model images sell the fit and lifestyle. Detail images prove the construction. Flat lays can support color, print, or folded-pack presentation.
The strongest ecommerce pages combine these images with a clear purpose.
Catalog consistency is part of the edit
One strong product image is useful.
A consistent catalog is more valuable.
Apparel brands rarely publish one item at a time. They upload collections, size groups, color variants, seasonal drops, and marketplace batches. If every ghost mannequin image has a different crop, shoulder height, color temperature, or shadow density, the catalog starts to feel messy.
The product grid should feel like one visual system.
A ghost mannequin style guide should define:
- Crop ratio
- Product margin
- Shoulder height
- Collar depth
- Neck joint style
- Shadow softness
- Background color
- Image size
- File format
- Color correction standard
- Wrinkle cleanup level
- Naming system
- Export requirements
This keeps the editing team from making subjective choices on every image.
Consistency does not mean every garment should look identical. A hoodie should not have the same body shape as a silk blouse. A structured blazer should not be softened until it looks like knitwear.
Consistency means each product follows the same visual rules while keeping its real structure.
That is the difference between a clean catalog and a folder of individually edited images.
For larger ecommerce teams, consistency also reduces internal review time. The merchandiser, photographer, designer, and ecommerce manager can evaluate images against one shared standard. Fewer subjective comments. Fewer repeated revisions. Fewer delays before upload.
Over-editing makes apparel less trustworthy
Apparel editing has a common trap.
The team wants the product to look cleaner, sharper, and more premium. That intention is good. The risk appears when the editor removes too much of the garment’s real behavior.
Fabric needs some texture. Sleeves need natural weight. Collars need believable depth. A small wrinkle may show how the material falls. Removing every fold can make the product look plastic.
Ghost mannequin editing should improve clarity, not erase the garment’s character.
A good rule:
Clean distractions. Preserve product truth.
Remove dust, mannequin residue, harsh wrinkles, pins, edge halos, and inconsistent shadows. Keep fabric weight, seam direction, construction, texture, and natural shape.
A cotton T-shirt should still feel like cotton. A leather jacket should still feel structured. A silk blouse should not become stiff. A hoodie should not lose its weight.
The customer should receive the product they expected from the image.
That is where editing supports trust.
Common ghost mannequin mistakes
Most bad ghost mannequin edits fail in predictable ways.
The first mistake is a pasted collar. The inner neck image is inserted, but it does not match the main product’s angle or lighting. The result feels artificial.
The second mistake is uneven shoulders. The editor removes the mannequin but does not correct the garment’s balance. One side sits higher. The body tilts. The product looks poorly made.
The third mistake is flat depth. The editor removes all shadows, so the garment loses volume. The image becomes clean but lifeless.
The fourth mistake is over-cleaned fabric. The editor removes every wrinkle and fold. The product starts to look synthetic.
The fifth mistake is inconsistent cropping. One product fills the frame. Another sits too low. Another has too much white space. The product grid becomes harder to scan.
The sixth mistake is weak edge control. The garment may show leftover mannequin edges, halos, jagged cutouts, or missing fabric details around the collar and sleeves.
These are small problems, but they compound across a catalog.
A single weak image may pass. A full collection with weak editing starts to lower trust.
A practical ghost mannequin workflow for apparel teams
A clean workflow prevents most problems before they reach editing.
Use this process:
Prepare the garment before shooting Steam or lightly clean the garment. Remove lint, dust, pins, and visible tags that should not appear in the final image.
Shoot the main mannequin image Make sure the garment sits naturally. Check shoulder balance, sleeve position, collar shape, and hem alignment before capture.
Shoot the inner neck image Remove or adjust the garment so the editor can see the inside collar, label, and fabric construction. Keep lighting and camera angle as close as possible.
Capture support details when needed For jackets, hoodies, dresses, and structured products, shoot extra lining, cuff, hood, or back images.
Provide a style reference Show the editor the preferred crop, background, shadow, and final catalog look.
Edit the ghost mannequin image Remove the mannequin, composite the inner neck, rebuild hidden areas, clean fabric distractions, correct symmetry, and refine shadows.
Run QA before upload Check collar realism, shoulder shape, sleeve fall, fabric texture, color, crop, and batch consistency.
This process is simple. The discipline is in repeating it across every SKU.
A good ghost mannequin system does not rely on memory. It relies on a repeatable standard.
A simple ghost mannequin QA checklist
Before publishing ghost mannequin images, review them like a buyer would.
| QA Check | What to Look For |
|---|---|
| Collar realism | Inner neck area looks aligned, natural, and properly shadowed |
| Shoulder symmetry | Garment does not lean or twist unnaturally |
| Sleeve shape | Sleeves keep believable weight and position |
| Fabric texture | Retouching has not flattened the material |
| Shadow depth | Product feels dimensional without looking dirty |
| Crop consistency | Product sits at the same scale as similar SKUs |
| Color accuracy | Fabric color matches the real product |
| Edge quality | No mannequin residue, halos, or jagged cutouts |
| Label placement | Tag or label sits at a believable depth |
| Neck opening | Collar shape looks natural, not pasted or stretched |
| Batch consistency | Similar items follow the same visual standard |
This checklist catches the mistakes customers feel before they can explain them.
The best ghost mannequin images do not call attention to editing. They let the shopper understand the garment faster.
When should brands use ghost mannequin editing?
Use ghost mannequin editing when product shape matters and the garment needs a clean catalog presentation.
It is a strong choice when:
- You need consistent apparel images across many SKUs
- You want more structure than flat lay photography
- You want less distraction than model photography
- You need to show collar, neckline, or inner label detail
- You want a cleaner product grid
- You sell shirts, jackets, hoodies, dresses, sweaters, or structured apparel
- You need marketplace-ready images with a clean background
- You want product-first images for PDPs and collection pages
Avoid using ghost mannequin as the only visual style when the customer needs to see real fit on a body. In that case, use ghost mannequin images for product clarity and model images for fit context.
The question is not which style is better.
The question is what the image needs to explain.
What to send before ordering ghost mannequin editing
A clear brief reduces revisions.
Send these files and notes:
| Item | Why It Helps |
|---|---|
| Main mannequin photo | Gives the editor the garment structure |
| Inner neck photo | Allows clean neck joint reconstruction |
| Back photo | Helps with alignment and rear product details |
| Detail photos | Helps rebuild cuffs, lining, hood, zipper, or hem |
| Current catalog sample | Helps match crop, spacing, and shadow style |
| Background preference | Prevents mismatched export style |
| Output size | Ensures the final image fits your website or marketplace |
| File naming rules | Keeps bulk delivery organized |
| Revision notes | Clarifies what should stay natural and what should be cleaned |
The brief does not need to be long. It needs to be specific.
For example:
“Use white background. Keep natural fabric texture. Clean dust and mannequin marks. Match crop to existing product grid. Preserve collar depth. Do not over-remove folds.”
That kind of note saves time because the editor knows what matters.
Reframe Visuals’ approach to ghost mannequin editing
Reframe Visuals treats ghost mannequin editing as a structured apparel workflow, not a quick object removal task.
The process uses manual isolation, neck joint compositing, garment shaping, fabric cleanup, and consistency checks to create clean hollow-body product images. For apparel brands, this helps turn mannequin-shot clothing into catalog-ready visuals that show shape, neckline detail, and product structure without the mannequin in the final frame.
The best results come from clear inputs:
- Main mannequin photo
- Inner neck or label photo
- Back image when needed
- Brand crop reference
- Preferred background
- Sample image from the existing catalog
- Output size and file format
- Notes on wrinkle cleanup level
With those pieces, the editing team can match the brand’s product grid and reduce revision cycles.
This is especially useful for apparel teams working with bulk product photos. A single product may be easy to judge manually. A full collection needs a consistent system. That is where ghost mannequin editing becomes more than a visual effect.
It becomes part of catalog production.
Final takeaway
Ghost mannequin editing is not just a cleaner way to remove a mannequin.
It is a method for showing apparel structure.
A good edit helps the shopper understand the garment before reading the size chart. It shows neckline depth, shoulder shape, body width, sleeve fall, fabric behavior, and product construction with fewer distractions.
For ecommerce brands, that clarity can make product pages feel more complete, more consistent, and more trustworthy.
The goal is simple.
Show the garment accurately. Remove the distraction. Keep the shape.
Get an exact price for your images.
Tell us your volume and the edits you need. We reply with a price, and you can send sample images to make it exact.
Questions answered
5 questions
Ghost mannequin editing is a post-production method that removes the mannequin or dress form from apparel photos and rebuilds hidden garment areas, usually with inner neck, back, or detail images. The result is a clean hollow-body product image that shows shape and structure without the mannequin.
Most products need a front mannequin image and an inner neck or label image. Jackets, hoodies, dresses, blazers, and structured apparel may also need back, sleeve, cuff, hood, hem, or lining photos so the editor can rebuild hidden areas accurately.
It helps shoppers understand collar shape, sleeve fall, body width, fabric behavior, and product structure before they read the size chart. That clarity can reduce doubt and make the product page feel more trustworthy.
Use ghost mannequin editing when the product needs a clean catalog image with more shape than flat lay and less distraction than model photography. It works well for shirts, jackets, hoodies, dresses, sportswear, sweaters, kidswear, uniforms, and structured apparel.
A natural edit needs matching source photos, careful neck joint compositing, believable shadows, balanced shoulders, clean edges, preserved fabric texture, and consistent crop across the product set. The edit should improve clarity without making the garment look fake.
No matching questions
Try a shorter keyword, or choose another category.