Support Images in Product Photography: How Multiple Shots Build One Final Image
How editors use support images to merge focus, exposure, shadow, and detail from multiple shots into one clean, accurate ecommerce product photo.
TechniquesPublished July 8, 20267 min readBy the Reframe Visuals editors
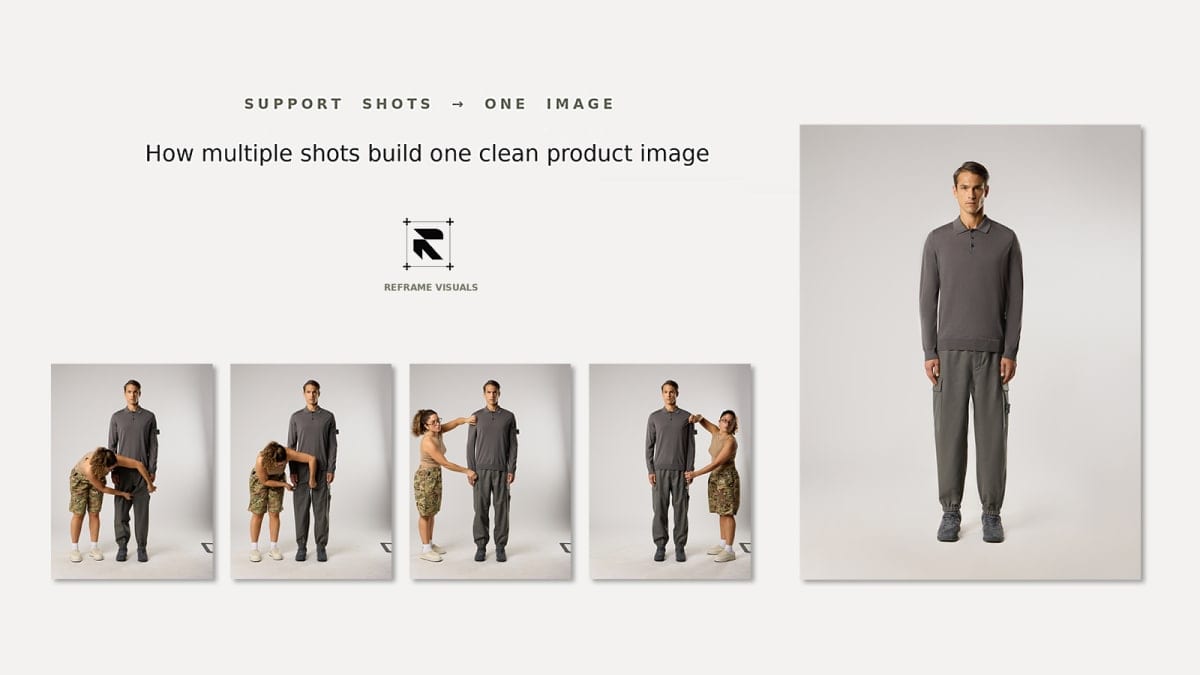
Some product images cannot be finished from a single photo.
The main shot may have the right angle but a weak shadow. Another shot holds better texture. Another has the sharpest logo. Another catches cleaner light on one side. Another shows a part the main frame hides.
Product photographers solve this with support images: extra source shots captured to complete one final image. In the wider industry this sits under compositing, also called image compositing or composite photography. Focus stacking and exposure bracketing are narrower versions of the same idea, one for focus and one for exposure.
At Reframe Visuals, we call these supporting source files Inclip files. The name is ours. The technique is standard. Whatever you call them, the goal is the same: use several helpful shots to build one stronger final image.
What are support images in product photography?
Support images are extra source photos captured to complete one final product image. Each one solves a specific problem: sharper focus, cleaner shadow, better texture, correct exposure, or a part the main frame hides. The editor merges the useful areas into one composite. At Reframe Visuals, these files are called Inclip files.
This is different from sending extra product photos for a gallery. A gallery image stands alone. A support image supports another image. The technique often solves problems caused by a shallow-focus lens, a limited camera setup, or a product with visual issues, and it lets the photographer deliver a strong final shot without top-tier gear.
For example, a photographer may shoot one main angle of a shoe, bag, jewelry piece, bottle, or garment. The main image has the correct composition, but one area is soft, blocked, dark, or reflective. The photographer then captures extra shots with small changes:
- Slightly different focus
- Slightly different lighting
- Cleaner shadow
- Better texture visibility
- Better exposure
- Better highlight control
- A clearer product part
- A better reflection or surface detail
Those extra images help the editor build a cleaner result. The editor may not use every support image. A good support shot earns its place because it solves a specific problem.
Want your product cutouts to look grounded rather than floating like stickers?
Add authentic natural, drop, or cast perspective shadows to your catalog images. Get 3 free sample shadow creations crafted by senior commercial retouchers.
Problems solved by support-image compositing
Support images help when one photo cannot carry all the visual information a clean final product image needs.
Product photography runs on trade-offs. If the highlight looks good, the shadow goes weak. If the logo is sharp, the edge turns soft. If the front surface is clean, the side texture hides. If the exposure suits one material, another material loses detail. Support images give the editor more material to work with.
| Problem | How support images help |
|---|---|
| Soft or blurry areas | A sharper support shot replaces or strengthens the weak area |
| Uneven focus | Multiple focus points merge into one clearer image |
| Missing product parts | Another shot provides the blocked or hidden detail |
| Poor shadow | A better shadow shot blends into the final image |
| Wrong exposure | A better-exposed support shot recovers detail |
| Weak texture | A support shot shows fabric, leather, metal, glass, or surface detail |
| Complex retouching | Editors use clean source detail instead of inventing pixels |
| Harsh light | Softer support lighting reduces blown highlights or glare |
| Color imbalance | Better tone references balance the final image |
Not every product needs this. Simple products with clean lighting and sharp capture may need one strong image. Support-image compositing matters when the product is difficult, reflective, textured, transparent, layered, or visually complex.

Merge focus areas and remove blur
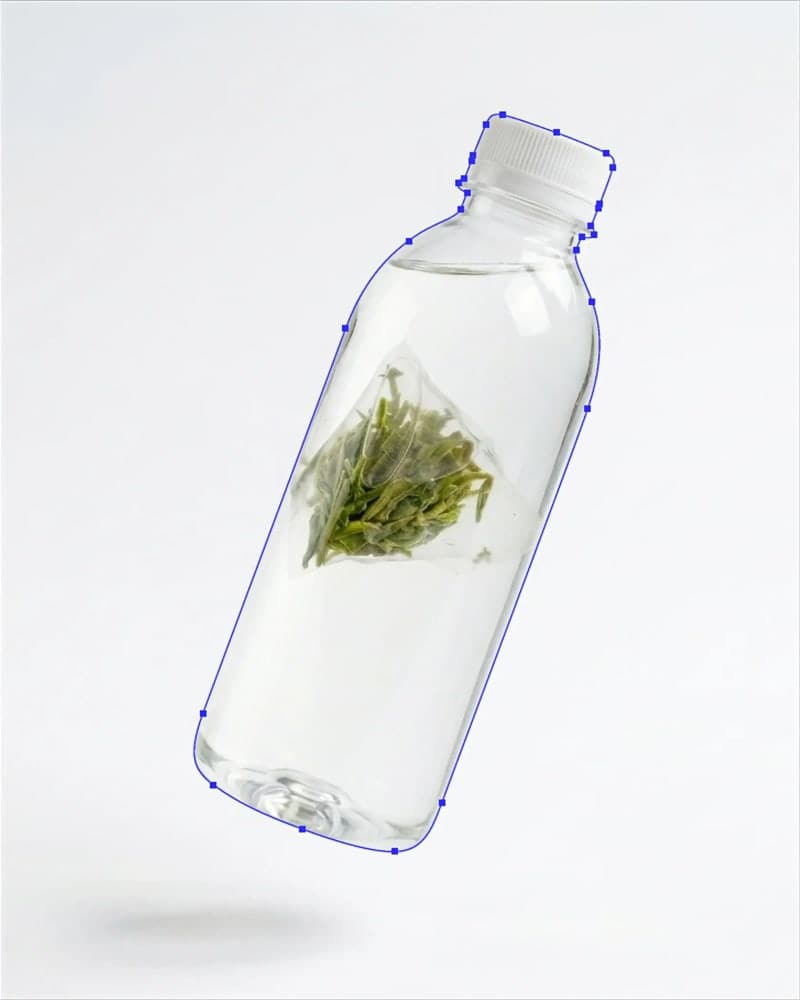
One of the most useful support-image applications is focus merging, known in the industry as focus stacking.
A camera may not keep every part of a product sharp, especially in close-up work. Jewelry, shoes, watches, cosmetics, bottles, and small premium items have depth. The front looks sharp while the back falls out of focus. The logo looks sharp while the edge goes soft.
Support images fix this by capturing different focus points. One image focuses on the front. Others focus on the logo, edges, or textures. Frames with fewer reflections work as source detail for a cleaner composite. The editor then merges the sharpest parts into one final image.
This matters because blur is not easy to fix after the fact. Sharpening tools help a little, but they cannot recover real missing detail. When the original has no texture data, heavy sharpening creates halos, noise, crunchy edges, and artificial detail.
A support image gives the editor real information. That is the difference. Instead of forcing one blurry frame to look sharp, the editor pulls a truly sharp source area and blends it in. It is the same discipline behind focus stacking and exposure blending.
Join parts together and build a complete image
Support images also help when the final image needs parts from several captures.
One shot shows the front correctly. Another shows the side better. Another shows the handle, cap, tag, strap, label, or reflective edge more clearly. One frame has the cleanest shape, another has the better material detail. The editor joins the useful parts into one image that feels complete.
This is not random patchwork. Good compositing needs control. The editor must match angle, scale, perspective, light direction, shadow behavior, texture, color tone, edge quality, and product shape. When these do not match, the composite looks fake. This kind of controlled image manipulation is what keeps a multi-shot result reading as one honest photograph.
A good support-image composite should read as one natural photo. The customer should never notice that several frames built it. They should see a clear product image with accurate detail.
This helps most with:
- Reflective surfaces
- Transparent materials
- Glossy packaging
- Jewelry stones
- Bags with straps or handles
- Apparel with layered fabric
- Products with labels or small printed details
- Products with both bright and dark materials
One capture rarely shows all of that well. A support-image workflow gives the final image a better chance.
Make retouching easier
Support images make retouching easier because the editor works from real product information instead of guesswork.
Without support files, complex retouching gets slow. The editor removes blur, rebuilds texture, cleans reflections, fixes shadows, repairs edges, or recreates hidden areas from limited data. Possible, but slower and riskier. With support images, the editor pulls from clean source areas instead.
This helps with:
- Removing unwanted blur
- Retouching difficult areas
- Rebuilding missing product parts
- Cleaning reflections
- Repairing damaged-looking edges
- Replacing weak texture
- Improving shadow quality
- Recovering highlight detail
- Balancing color and tone
- Preserving product truth
The key phrase is product truth. Good editing improves clarity without changing what the product actually is. Support images provide real detail from the same product, not invented detail from imagination. That is also why a clean clipping path and real source frames beat pixels an algorithm guesses at.
That matters for ecommerce. Guess too much, and the final image looks polished but inaccurate. Use real support images, and the final image looks cleaner while staying true to the product.
Prerequisites for a good support-image workflow
A support-image workflow works best when the photographer plans for it during the shoot.
The editor can only merge frames cleanly when the support shots stay consistent enough. If the product moves too much, the angle shifts, or the light direction changes, compositing gets harder.
| Requirement | Why it matters |
|---|---|
| Stable camera position | Makes alignment easier |
| Consistent product position | Keeps perspective and shape accurate |
| Similar lighting direction | Helps the composite feel natural |
| Similar exposure range | Prevents mismatched brightness |
| Enough overlap between shots | Gives the editor blending room |
| Clear focus purpose | Lets each support shot solve one problem |
| Clean file naming | Shows the editor which file supports which area |
Support shots do not need to be perfect. They need to be usable. Each file should answer one question: which part is this shot helping? Focus? Shadow? Texture? Exposure? A missing detail? Color reference? When the photographer knows the purpose of each frame, the editor works faster.
Use a tripod: not compulsory, but strongly recommended
A tripod is not always compulsory, but it helps a lot.
Support-image compositing depends on alignment. When the camera stays fixed, the product shape, angle, and perspective stay consistent across captures. That makes merging cleaner and cuts the risk of warped edges, mismatched scale, or unnatural shape.
A tripod gives you:
- The same camera angle
- The same product perspective
- Easier layer alignment
- Cleaner focus merging
- More accurate shadow blending
- Faster editing
- Fewer distortions
- Better batch consistency
This matters more for close-up work. Small camera movements create visible perspective shifts. A ring, watch, bottle, shoe, or bag can move enough between frames that simple alignment stops working. Handheld support shots still work, but they need more discipline. If a tripod is available, use it. If not, hold the camera position as steady as you can and capture enough overlap.
Handheld shots work if you control consistency
Handheld support shots are not automatically bad. They turn into a problem when the angle, distance, and perspective drift. A support image with better texture becomes hard to use if it came from a different position. The editor then spends more time matching the frame than using it.
For handheld support shots:
- Keep the same camera height
- Keep the same distance from the product
- Do not rotate the product between shots unless you need to
- Keep lighting direction similar
- Shoot extra frames for safety
- Avoid changing focal length
- Keep the main product shape visible
- Do not crop too tightly
- Capture enough overlap around the target area
The goal is not perfection. The goal is consistency. A handheld shot earns its place when it gives the editor a clean source area that matches the main image: a sharp texture, a clean logo, a better highlight, a clearer shadow. The closer it matches, the better the final composite looks.
More support-image applications
Support images do more than focus and missing parts. They improve several technical areas of the final image.
Exposure correction. Some products carry bright and dark areas in the same frame, and a single exposure cannot hold both. One support shot preserves highlights, another preserves shadow detail, and the editor blends the useful parts. This is the industry technique called exposure bracketing. It helps with reflective packaging, jewelry, glass, metal, black products, white products, and glossy surfaces.
Brightness control. When the main image has the right shape but uneven brightness, a cleaner support shot corrects specific areas without flattening the whole product. The result should read as natural, not artificially lit.
Shadow improvement. Shadows ground a product, but they turn harsh, weak, dirty, or inconsistent. A support shot with better shadow behavior helps the editor rebuild a cleaner base shadow or add depth. This is where dedicated shadow creation keeps ecommerce images real but clean.
HDR-style detail recovery. Support shots create an HDR-style result without the over-processed look. The goal is controlled detail recovery: clean highlights, readable shadows, visible texture. This helps when one photo cannot hold the full range.
Color and tone balance. If one frame shows the product color more accurately, the editor uses it as a reference. If another has a better material tone, it guides the correction. Accurate color correction matters for apparel, cosmetics, jewelry, furniture, packaging, and accessories, where color accuracy drives buyer trust.
A simple support-image capture checklist
Before sending files for editing, run this checklist:
| Check | What to do |
|---|---|
| Main image | Capture the best overall composition first |
| Focus support | Shoot sharp versions of key details |
| Exposure support | Capture brighter and darker versions when needed |
| Shadow support | Capture the cleanest shadow or grounding option |
| Texture support | Capture material detail clearly |
| Missing part support | Shoot hidden or blocked areas separately |
| Color reference | Include the most accurate color version |
| Tripod | Use one whenever possible |
| Handheld consistency | Keep angle and distance stable if handheld |
| File naming | Label support files clearly |
Good naming helps the editor read the workflow. It is not compulsory when the differences are obvious, but names carry weight when they are not.
Instead of sending files like this:
- IMG_4012
- IMG_4013
- IMG_4014
Use names like this:
- Main_angle
- Focus_logo
- Focus_edge
- Shadow_base
- Exposure_highlight
- Texture_side
- Color_reference
The names do not need to be fancy. They need to be readable.
What to send to Reframe Visuals
For support-image work, send the main image first. Then send the support images that complete it.
A good brief stays simple:
"Use Main_01 as the base image. Use Focus_Logo for the logo, Shadow_01 for the base shadow, and Texture_02 for the side material. Keep the final image natural and ecommerce-ready."
Send:
- Main image
- Support focus shots
- Support exposure shots
- Shadow reference
- Texture reference
- Color reference
- Final crop requirement
- Background preference
- Output size
- Notes on what should stay natural
The fewer guesses the editor makes, the cleaner the final result.
How Reframe Visuals handles support images and Inclip files
Reframe Visuals treats Inclip files as production support files, not random extras.
The goal is to use the best parts of each support image while keeping the final image natural, accurate, and ecommerce-ready. The process can include focus merging, detail replacement, exposure blending, shadow correction, color balancing, texture preservation, and complex retouching.
This helps when one product image needs more information than a single shot can hold. For ecommerce teams, it cuts editing friction, because the editor works from better source material. Instead of forcing one imperfect image to carry the full result, the final image is built from the strongest available parts. That makes complex retouching more controlled, and it protects the product's real look. When a shot is missing entirely, we would rather rebuild it from real support frames than lean on AI-generated image refinement to invent it.
Have a set of support shots you want merged into one clean image? Request sample pricing and send the frames — we will tell you which ones earn their place.
Final takeaway
Support images are not extra photos for the sake of extra photos. They are source files for one final image. Inside Reframe's workflow, we call them Inclip files.
A good support-image workflow lets the editor merge focus, remove blur, join product parts, improve exposure, control shadows, balance color, preserve texture, and complete complex retouching with real detail.
Use a tripod when you can. Keep handheld shots consistent when you cannot. Capture each support shot with a clear purpose.
The final image should look simple. Behind it, the workflow may use five, ten, or more source files. That is the point. Use the extra images to make the final image cleaner, sharper, and more truthful.
Get an exact price for your images.
Tell us your volume and the edits you need. We reply with a price, and you can send sample images to make it exact.